Sunday, November 26, 2006

A Good weekends work


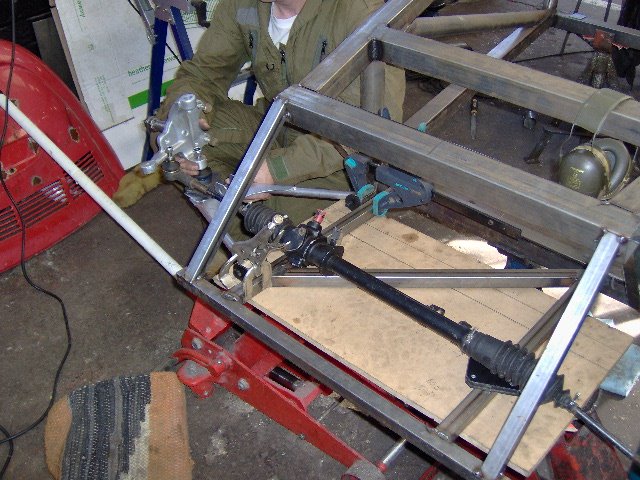
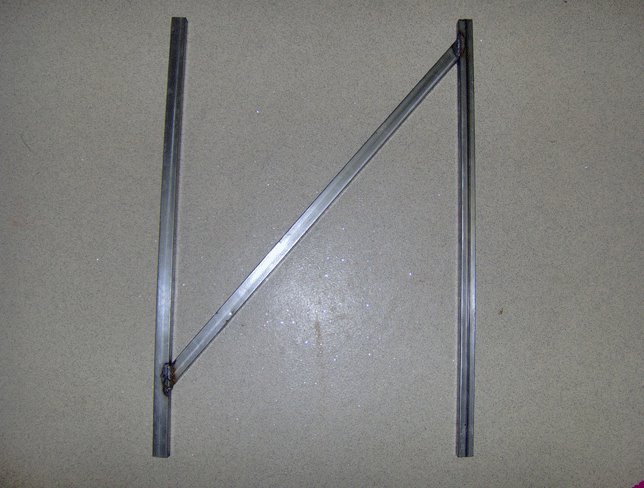
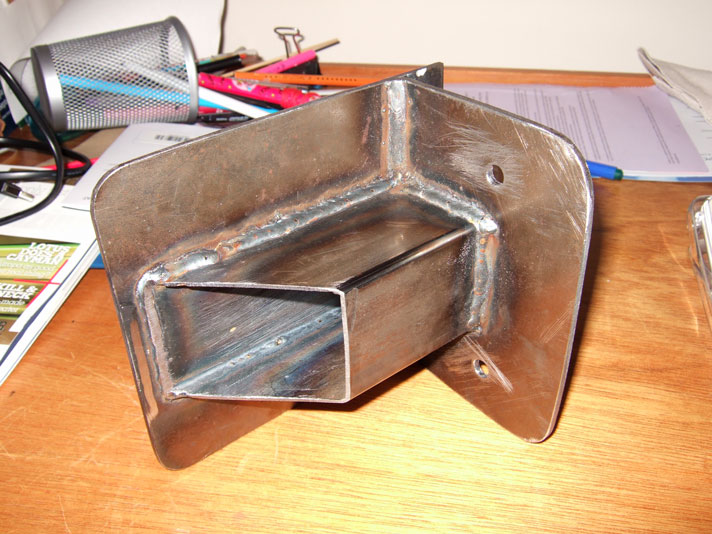
Had a good weekend of work. John and his family visited so while our brave wives dealt with 5 kids, we went to the workshop! While I welded up all the tacked joints, John fabricated the mount for the steering column, which I later welded up. John then made the cross piece for the top of the chassis. The mount will bolt to additional cross pieces not yet made.
I have been agonising for ages about what to do for the floor. I had been given a large sheet of 18g steel to use, but I was worried about it flexing as I got in and out. Aluminium was my preferred option, mainly for the weight, but the current prices are very high and it seemed silly to spend £50 or £60 when I had perfectly good steel. I then noticed a Fiesta back seat in the scrap bin. The back of this is thin steel but it has ribs pressed into it and supporting bars. I have now cut this down to use at the front of the footwell and I’ll use the this steel under the seat where you don’t stand, as you can see form these photos.

Thursday, November 09, 2006


Had a much more successful time today. Managed to cut and drill 2 sets of seat rails, the lower portion on the centre tunnel and cross member and the ‘verticals’ for the front and rear bulkheads. Doesn’t sound much when it is listed like that but it was a good 2 to 3 hours of solid work this afternoon. It is getting quite exciting now that the prospect of finishing all the metal cutting is looming nearer!
Time to get the welder out and join this lot together!

Wednesday, November 08, 2006

No steps forward, two back

Had a very simple goal today. 1. Remove Engine 2. Begin fabrication of tunnel. Time allocated: Task 1 - 10 mins, task 2, rest of morning. Oh that it were so simple! Began by positioning hoist to support engine so that once the mounts were undone, the chassis could be lifted a few cms to clear them before manoeuvering it clear past the exhaust stub, which will be going soon! However, for some reason, the engine didn't come out level and the right engine mount remained not only firmly attached, but also skewed so that no motion either wasy was possible. 2 hours of fruitless effort followed during which time I was unable to budge anything. At least the integrity of the welding was proven as the entire engine/gearbox were suspended from one mount while I 'tapped' it to free it. Unfortunately I caught a glancing blow on a couple of pieces loosly tacked in place, which fell off! Eventually I was forced to admit defeat as the mount had begun to bend. I had to cut it off the chassis. Time was then up for the day so I returned home for lunch a very unhappy bunny! Maybe tomorrow when I have chilled a bit I will start task 2 on my list!

Reminder to self: Supposed to be enjoying this!!!!

Tuesday, October 17, 2006


I finished the front end, as predicted, a week or so ago but forgot the camera so here are the photos. Meanwhile I have been sorting the rear track control arms. I cut the arms off the Fiesta steering rack - fortunately they were not hardened. I then had the inner ends turned down to 12mm and cut a thread onto them so that they will take the bearings that I am no longer using for the rear struts. All this took time as I had to get them turned at work and then await for delivery of an M12 fine die to cut the threads. All I need now are 2 new track rod ends.

Tuesday, October 03, 2006

Front end


Got around to sorting out the front end today. First I spent some time repositioning the front tubes that had skewed - cutting them off and re-aligning them. It was only about 7mm but well worth the effort to get it all sorted. I then started tacking the front suspension brackets. I had some on but when I touched them, they fell off. I cleaned them up, made sure the metal was really clean and tried again, with the same result. Then I noticed that the welder had been knocked and the switch had gone from ‘A’ to ‘1’, meaning I was using minimum power! Changed settings - sorted. It took a long time to get the brackets on all square. By the end of the afternoon I had one side done and couldn’t resist gently putting it all together! Hopefully the other side should be much easier and be completed in the next day or so.

Wednesday, September 20, 2006

Rear suspension - second half


A good mornings work today with the other side of the rear suspension tacked in place. Not without trauma though as no amount of persuasion would make the ball joint engage in the bottom of the hub - it's even an official Ford part, bought from e-bay so despite appearing identical to the others, it may be from a slightly different model. Fortunately I had the scabby remains of one of the donor lower arms and was able to retrieve the joint from that, at least until I can find a replacement. Once this was all done, I re-checked the front frame for squareness, only to discover that it had skewed during tacking, on one side, so that will have to be re-done next.

Sunday, September 10, 2006

Back at last!


We finally got back in the workshop this weekend now that summer holidays are over! It took a while to sort out what was what and find everything we needed, not helped by the usual invasion of leaves that had to be cleared away before work could commence. John continued at the front. First he had to remove a lower frame that had previously been tacked into position - somehow it was 5mm off centre. Once this had been re-fitted and re-levelled, the vertical pieces that will support the wishbones had to be cut and tacked into place. At the back we expended a lot of mental energy deciding the best way to attach the lower wishbone, following the latest modifications at the rear. In the end it was a relatively simple solution that proved the best (isn’t it always?) and I got on sorting this out. Once the front was tacked up, for the first time we were able to accurately mock up the relative positions of the wishbones and steering rack, as shown here. It all looks like it should go together without too many problems.......
At the back, with one side sorted, I couldn’t resist putting a wheel on and seeing how it looked! I also got on and ground off the remainder of the old rear tubes, and fabricated the components for the other side. Unfortunately progress was halted at that point as the suspension brackets made for me in a local workshop have the wrong size bolt holes, so no further progress was possible until I have re-drilled these!

Wednesday, June 28, 2006

Out of Country!!

Sorry folks, I'm out of the country with work now until the end of July so there will be no progress to report on! Hoping for a big push in August when I'm back though!

Thursday, June 15, 2006

Week off - part two


Spent another morning in the workshop today finishing off the brackets for the struts. All went quite well with one exception. I wanted to weld the round diagonal to the new bracket on the bench, rather then try to weld a difficult joint on the car. no matter how many times I tried, I couldn’t get even a decent tack though - I think it was an earth problem. In the end I gave up and tacked the bracket to the car and then the round tube to the bracket/car. They will be fully welded when the engine comes out prior to the floor going in. Then offered the wheel up to check clearance on my planned exhaust routing - which was fine. However, the rim of the wheel just fouls the spring seat of my new shocks - looks like a spacer will sort that though. Next up is to tack on the brackets for the lower arm.

Tuesday, June 13, 2006

It's been hot!


Well, the weather over the last few days has prevented the inclination to get into the workshop, however, today was much cooler. As I have a week off work I managed not only to negotiate a morning off domestic duties, but also persuaded my better half to assist! Whilst she primed and sprayed the front wishbones (e bay purchases some months ago!) I set about making two new mounts for the new mini-struts. There purpose will become clearer later this week when I hope to get them onto the car! Here is a shot of todays progress - considerably more artistic than my usual efforts - guess who took it?!

Monday, June 05, 2006

Rear mock up


It's been a quiet month - the aftermath of moving house with the inevitable trips to Ikea and subsequent domestic DIY have meant little progress. however, a trip to Wiltshire for a wedding and a visit to John afforded me the opportunity to collect my latest e bay acquisition on the way home - a pair of mini-struts, adjustable for rate and ride height. Although a little shorter than ideal, I will adapt the rear of the car accordingly - shouldn't be too much work and much easier than the Fiesta struts, and much cheaper than the alternatives. I have also been talking to Wunoff exhausts, top people who I won a silencer from in a competition. This is why I have mocked up the rear of the car, to ensure my prize will fit! Don't worry, the tape will be replaced with more permanent fixings and the silencer and pipe will be stainless! Although the rear of the car is pretty much as I envisaged it 8 years ago, a few lotus 340R influences have crept in, resulting in the removal of the panel upon which the lights and number plate were to be mounted. With a bit of luck the spacing should prevent Mr SVA and his radius tool from getting at too much of the rear! Let me know what you think!

Thursday, May 04, 2006

Tuesday, May 02, 2006

John is back!!!

Finally got back in the workshop this weekend. John and his family came to stay and John and I spent most of Saturday working on the car, with high hopes of actually getting it onto 2 wheels. I set to work finishing suspension brackets and re-doing some welds on the wishbones, while John began to fabricate the structure at the front where the front suspension will attach. The front progressed well and finished up with about half of it tacked into place. At the rear however, things were a bit difficult. Having attached the lower wishbone on one side, it became apparent that the intended location of the top mount was not feasible. After much thought, the difficult decision to remove one of the chassis tubes was made.
We were always aware when we changed from Rover mechanicals to the Ford engine, that we would probably have to move something, however, it was still difficult cutting away what was actually quite a tricky tube to cut to size. Once this was done, the top mount was tacked on and the strut bolted into place temporarily. When we tried to compress the strut, it didn’t move and the whole car lifted.

Again, much head scratching ensued with the conclusion that as the strut has been at full extension on the stops oaf a while, maybe it has a bit of ‘stiction’ and may need a technical tap to free it. Unfortunately we had to call it quits at this point and return to 2 wives and five kids........Can’t wait to get back in the workshop again!

Wednesday, March 29, 2006

I'm supposed to be enjoying this!


Finally got back in the workshop last night. The reason for the delay? Partly grotty cold, the rest see here http://www.totalkitcar.com/tested.php#1136

Anyway, finished the second suspension bracket last night and went to weld up the first. First weld went OK, but was disturbed during the second. Re-welded it but it had a few pin holes in it, so ground it back to check it - didn't look too bad. Then went to weld the other side of the joints. First the wire got stuck to the tip. Freed it, then the wire stuck again and tripped the power. Removed the tip and tried to replace it but couldn't get the new tip on. Also, the welder is now not operating, so I must have blown a fuse somewhere. I hope it is not worse! I won't be getting much done for a while now as I am moving house this weekend. By the time I've finished that, John will be back in the country and I can look forward to a weekend of mechanical mayhem while respective other halves and kids get together!

Tuesday, March 07, 2006

A Car is Born............NOT

For those of you in the UK, one of the Discovery Channels is repeating the' A Race Car is Born' Series in which TV Vet Mark Evans makes a Westfield. In last nights episode, we were treated to Mark 'Smug Git' Evans opening the next box of brand new bits to assemble another part of his car, followed by him saying to camera 'and look what we've achieved in just four days'. Full of inspiration I went to the workshop determined to make real progress. 2 hours later I had made 1 sodding bracket. Ok, it was a particularly tricky shape, but I didn't even get time to weld it! And I've got to make one for the other side as well. With a house move looming, my glacial progress doesn't bode well, although for now the 'car' will remain in the workshop where it is. Still, Birthday approaches and offers of money to buy bits mean that I can treat myself to a couple of M12 fine pitch female rose joints!!!

Las week I ground off all the bird s*** welds on the wishbone and re-did it using advice from the ever helpful Locostbuilders. Much better, but still a little inconsistent - but someone more experienced than I said that they looked 'plenty strong enough'. Both bottom wishbones are now made, hance the work above on the brackets. When these are made, and I have my birthday 'treat', the car will be sort of on two wheels at least!!!

Thursday, February 23, 2006

More rear suspension


Drilled the second set of arms tonight, then welded in the inserts. These were then welded to the plates - hurray, one wishbone complete. The welding isn't the neatest - some bits went really well, others look messy, but there is excellent penetration and they seem v.strong!

Wednesday, February 15, 2006

More rear suspension

Spent Monday evening cutting and drilling another plate for the other side of the suspension, and cutting another two suspension arms. Next will be to weld the rod-ends into these arms, then it'll be time to assemble the two wishbones. Unsuprisingly, Tuesday being Valentines day, I thought it prudent to spend the evening at home! Would be bitter irony to have anniversary of divorce on Valentines! It is now Wednesday, divorce succesfully avoided, I hope to do some more work tomorrow as I'm away at the weekend again. I have noticed that the site visitor count has hit 2000!! Thanks for looking everyone and keep watching!

Sunday, February 05, 2006

Back suspension Jig


Spent a bit of time today making the jig for the rear suspension. I also made the second arm of one side. I ran out of time with a little fettling still to do, but the photo should give an idea of what I'm trying to achieve.

Sunday, January 29, 2006

Work on rear suspension


I've decided that while the car is up on stands and level, I will sort as much of the rear as possible - when I come to finish the front, the engine will have to be taken out so I can bolt the frame to the jig, turn it over etc. As John is not around for a while, such tasks will be more cumbersome and difficult, hence the decision to sort as much as I can before the engine has to come out! This meant tackling the rear lower 'wishbones'. I discovered that Fiesta Ball joints were available separately, you don't have to purchase the entire lower arm as the Haynes manual suggests, and a spell on E-Bay yielded two of these. These will be bolted to a steel plate (on the other side to the way shown on the image) and welded to two arms. The ends of the arms will have spherical bearings, partly to allow adjustments, but also because I was given some complete with threaded inserts (albeit LH thread!). The inserts were a bit too big so a friend turned them down on a lathe - a bit roughly but they'll do. Today I drilled through the CDS tube and welded through the holes to hold the threaded inserts in place, then welded around the top. All of this was done with a spare bearing screwed into the insert to avoid distortion. I am quite pleased with the results - 1 down, three to go!!!

Wednesday, January 25, 2006

Back to work at last


After a lengthy break, I got started again today. Last week, John and his family, and me and my family, had a holiday at Center Parcs. John will now be away for a while so I am on my own. Now that I have the gearchange sorted, I set about making the 'N' frame - this will bolt in position under the engine to stabilise the back frame that mounts the rear suspension. I got this done but further progress was frustrated as someone has borrowed the pillar drill. Hopefully I'll be able to make some more progress at the weekend.

Wednesday, January 11, 2006

New Year KISS

It has been a slow few weeks - partly due to 'Royal Visit' from mother-in-law and her mother over christmas, and partly due to Johns house move. However, spent last night in workshop and have finally (I hope) resolved the gearchange. Originally I had intended to use a combination of rods and cables, that I sourced frmo a Fiat Coupe a mate was scrapping. Wasted a couple of evenings trying to get it working nicely but I was never happy. Last night I tried again, but the new linkage I tried just pushed the selector into an arc of movement outside of the possible range, so in a fit of pique, I junked it all and reverted o the original plan of a simple rod, as per GTM coupes and the like. It seems to work! Forgot camera though! Sorry. Also, yesterday I ordered front shocks and springs from Protech - very nice, helpful people and thoroughly recommended! Hope everyone out there had a good Christmas, Happy New Year to you all and keep watching! Front end is next...