Sunday, December 30, 2007

Three Wheels...


The last few months have seen slow progress once more! I have managed a few short visits to the workshop, but despite this I've made some progress. The universal joint that transfers the gearchange action to the correct location has been fabricated using an old steering linkage. The plan had then been to use some nylon bushing to ensure that the shaft in the tunnel moved smoothly, however, this didn't work very well so I am now using more rose joints which should make for a solid feel to the shift. Finally, as a pre-christmas morale boost, I assembled one of the front hubs and fitted it which now gives a good impression of what the finished chassis will look like - my 'little helper' couldn't resist his first test drive! Best wishes to everyone for the new year and here's hoping that it brings me more days in the week so I can get the car to a state where it can come home quickly!

Tuesday, September 25, 2007

Plug

I'added a plug for a fellow builders site to the sidebar. If you would like me to do the same for you, just leave a message!!

TTFN

JC

Sunday, September 23, 2007

Back to it at last.


At last some progress to report. Saturday began with John and I spending time aligning the brackets for the rear tie bars. These were adjusted carefully and the change in toe angle checked by using a laser pointer projecting onto a cardboard box 4m away. It was actually quite satisfying when the ‘sweet spot’ was found with no change discernible between full bump and full droop. I then set to work on the gearchange whilst john re-mounted the seats. I was never very happy with the previous mounts so they were replaced with threaded bar which now goes through floor rails. The gear change was prototyped in card first to ensure that the bracket fitted. It bolts onto the block using 2 of the transmission bolts. The lever is brought under the engine and now slides back/forth in a bearing. This will attach to a section of the steering column from the fiesta that has 2 UJs and a short shaft, before going along the centre tunnel. All in all, a satisfying weekend. At the end of it we couldn’t resist putting the back wheels on to see how it looked, and only lack of time stopped us assembling the front hubs!

Monday, September 03, 2007

I'm still here!!

Well, what a frustrating summer that has been - and I'm not just talking about the weather. last time i posted, I was looking forward to getting quite a bit done on the car. As you can tell from the lack of updates, this idea was foiled! I broke my shoulder 12 years ago whilst playing football and it chose this time to flare up again - I couldn't lift my arm, let alone do any cutting, filing etc. Unlike other times when it has caused problems, it took several weeks to settle this time and by the time it was usable it was school holidays and also time for a visit to canada with work! However, it is not all doom and gloom. Over the summer I sold the much loved MX5 - a bit of a girly car I know, but great fun nonetheless. This means that space has been created in the garage so the plan is for the mistrale to 'come home'. There is hopefully about a weekends work to get it temporarily onto 4 wheels so that it will go on a trailer - stay posted for more news!!!

Sunday, June 10, 2007


Finally taken photos of the gear linkage. At the top right is the piece that slips over the input shaft on the gearbox. I now have to carefully make the vertical and horizontal pieces that will be mounted at the ‘front’ of the engine to hopefully give a smooth action. Hopefully I will get a fair bit done over the next few weeks as I should be able to get to the workshop in my lunch break for once - keep watching! P.S. Congrats to Lewis Hamilton!!!!

Friday, May 25, 2007

Changing gear...

Just a quick update on a couple of hours work today (forgot camera again – sorry!) – although looking back I think ‘why the hell did that take so long’! Having decided that the radiator will be at the back of the car (probably), the natural follow on from that is that the fuel tank will go at the front (I think). This means (still with me?) that there should be room for the gear linkage to come under the engine, removing the need for the cable shift. So I spent time today making the new link bar. First was to find a suitable piece of tube to fit over the gear selector shaft. As it happens, an off cut of the tube that I used for the suspension was nearly perfect. I cut this to size and drilled it so that a 6mm bolt will go through the hole in the selector and clamp the tube firmly in place. To this tube I carefully cut and shaped a piece that drops vertically down. For this and the fore/aft link I used the selector rod left from the original Rover donor. I could have used the Fiesta rod but the Rover version is a bit meatier! Now all I have to fathom is how to attach the rod on the other side of the engine – the Sylva Riot links to the bellhousing bolts – if anyone out there has any photos I’d be really grateful! Bye for now!

Monday, May 07, 2007

May bank holiday update.


It’s the May bank holiday weekend and that can only mean one thing - the annual pilgrimage to Stoneleigh for the kit car show. Next year we really will have something to show.! To my mind, the show was notable for several prominent empty spaces in the exhibition halls as well as the debut of two cars very similar to the Mistrale - the SDR and the Rocket. There was also a reappearance of the Quantum Sunrunner. I particularly liked the Dax powered by a Bell Jet Ranger turbo-shaft engine - more on that one another time.

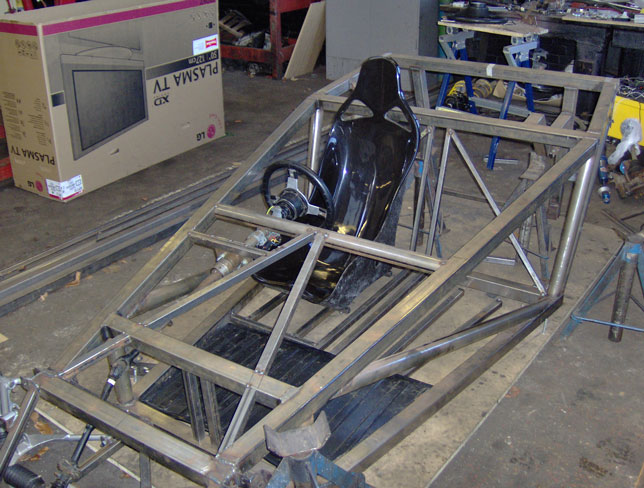
As John et al came down for the show, there was a busy weekends work on the car. first job involved grinding off the remnants of the bent engine mount and grinding off a weld on the other mount that I was less then satisfied with. Unfortunately, i was having a ‘Bad Weld Day’ and it took several attempts to produce a replacement that I was happy with! Next step was to get the engine back in position so that the new mount could be tacked in. Once the engine was in, John made the support struts whilst I busied myself with the gearchange. Originally I intended to use a shaft based system inspired by that on the superb Sylva Riot. However, with space at a premium I felt unable to position all the joins correctly so I am currently working on a combination of rods and cables. Fortunately in my ‘Steptoe’ box, I found an old bell crank that came off a motorbike at some stage in the past and this proved perfect to mate with the Fiat coupe cable I acquired! The fore/aft will be by a rod and I spent some time experimenting with an old Audi gear lever mated to Fiesta remnants to get a smooth action - unfortunately the Fiesta lever is a bit too butchered to use! I would love to use a shift like the one I saw on an Ultima at the weekend. dream on!
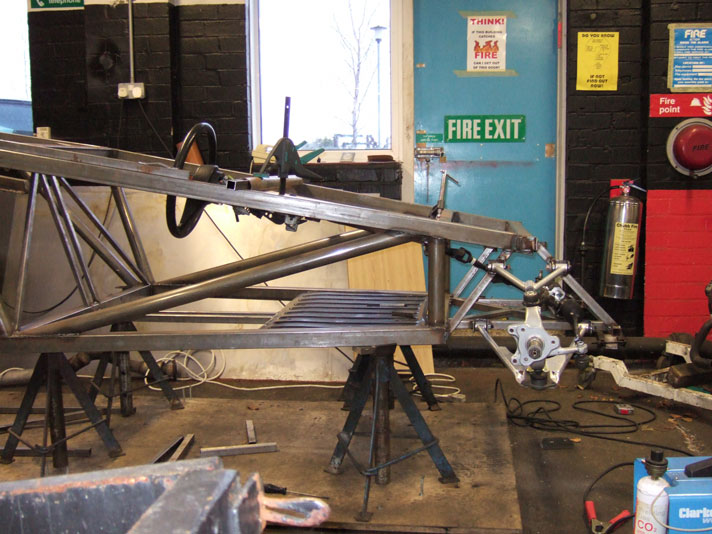
Meanwhile, John had the mount tacked in so it was out with the engine whilst he welded it fully. Finally it was back in with the engine to finish a busy, but very satisfying few days work! Whilst at Stoneleigh I bought a new radiator to replace the Fiesta one which wasn’t the prettiest! The princely sum of £10 each for rad and fan was paid. On our return to the workshop, we looked at various options for its positioning. We have (probably) decided to rear mount it above the gearbox - the prospect of long hot water pipes running through the tunnel with all the hydraulics and electrics seems worse that the extra weight at the rear of the car! This means that the fuel tank will now go at the front. Probably!

More soon!

Thursday, April 26, 2007

Latest progress


Apologies to all you mistrale watchers out there for the lack of recent updates. For me it has been a very busy time at work, which coupled with an Easter break in Cornwall has meant precious little time for car building. However, I finally managed a few hours today. The first task was to mount the passenger seat. The ‘Triton’ seats that I am using have threaded inserts built into the base. At first I thought that it would be a simple matter to bolt them onto fore/aft chassis rails, however, the profile of the seat base precludes this. Instead I have had to use lateral bars and bolt these onto the fore/aft chassis rails. This is not an easy task but it does mean that the harness cut outs are perfectly positioned with the rear cross member. The other task started today was to re-make one of the engine mounts to replace the one that bent the last time I removed the Zetec lump. The new one has ribs and a section of box that will prevent the same happening again.
Although I haven’t done mush actual work on the car, I have been expending a lot of mental energy trying to anticipate future problems. One of these is the fairly tight centre ‘tunnel’. The current plan is to mount the radiator at the front, which would of course mean that cooling pipes have to run the length of the car. An alternative is to have a side mounted radiator at the rear of the car. This would hopefully get enough airflow and would greatly simplify the plumbing. It would of course put more weight rearwards..... I’ll let you know how it goes!

Thursday, January 18, 2007

The simple things...


Why is it that whenever you think that you have a simple little job to do, it always ends up being far more difficult than you envisaged? Today I had the simple task of tacking in the tubes that support the seat. Unfortunately the first time I did it, the holes to mount the seat did not quite line up so I had to cut them off and start again. Having got it wrong once, I then spent a lot of time getting the alignment perfect for the second attempt - which worked eventually. Unfortunately this delay meant I used up all the time I had hoped to use to ponder pedal and gearchanges - I have this to look forward to next time!! I must confess to having spent a little time sat in the newly placed seat...! The only snag appears to be that the brake pedal may just catch the steering bottom bracket - however, I did have a large pair of boots on and it might look a bit different in trainers!

Friday, January 12, 2007

Steering at last


Another couple of days of good progress this week. Earlier I cut and tacked in the two diagonals from the shock mounts to the scuttle tube (which I also tacked in). Today I fabricated the mounts for the steering. The lower on used an exhaust clamp to hold the Sierra rubber bush. The clamp was than bolted to a bracket welded to the front tube. it took several attempts to get it correct as the clamp that joins the lower column was fouling the bracket. The upper bracket was made to bolt to the adjustable mount from the Sierra. At first I thought that a simple plate would flex but once everything was bolted in, it seemed immovable! The last thing I did before leaving was to cycle the front suspension through its rang of movement and was delighted to see that there was no bumpsteer whatsoever - the time spent with the laser over the new year was obviously well spent!

Wednesday, January 03, 2007

New Year News


Happy New Year t o you all! A lot to update today. First new purchases. From Rally Designs, I bought Caterham steering rack extensions, which extend the rack by 100mm. This means that the Escort Mk2 rack can be used otherwise unmodified. I also bought a pair of their aluminium rack clamps- a bit ‘bling’ but as the rack I have had no mounts, necessary. I have also addressed the steering column ‘problem’ by buying a Sierra column from the Cortina/Sierra on the A17 near Boston. It is just about the perfect length and at £17, much cheaper than having an adaptor machined for the Fiesta column. Finally Father Christmas (AKA Wife) bought me a pair of Sabelt Harnesses - these have yet to arrive though!
Anyway, before christmas, I made the mounts for the seats and tacked the rear bulkhead bracing - not as easy as it sounds as they slant in two directions! Over the new year, John and I made the rack mounts. First we clamped the rack in position and attached a laser pointer to one of the uprights. John then moved the suspension through its range of movement whilst I marked the bump-steer on a piece of cardboard 4m away - you probably can’t see the laser spot on this photo. We then progressively lowered the rack until we found the position where there was virtually no bump-steer at all.Typically this proved a pig to make mounts to hold the rack in this position but we eventually succeeded! Finally we mocked the steering column into position and decided how to attach it!
The next few weeks should see some rapid progress I hope! The hits counter has reached 5000 - they can’t all be John and I so how about leaving a message so that we know who is watching!? Cheers!